Using ImageMagick to Create Previews and Thumbnails from Uploaded Images
Introduction
This article and the accompanying ASP.NET Web Application demonstrate the use of ImageMagick to create thumbnails and larger preview images, both from an uploaded image file. The Web Application is written in C# using Microsoft Visual Studio 2008.
Background
Working in the graphic arts industry, much of the development I am involved with deals with the creation, processing, storage, and distribution of images and visually rich documents. One such recent project was the creation of a web-to-print solution for the Fine Art Reproduction division of our company, Lazer Incorporated. Preview the site at Lazer Incorporated Fine Art Gallery. The fine arts web-to-print solution consists of three user interfaces, as follows:
- public art gallery to display the works of artists who use our services,
- private, secure ordering system for artists to order fine art prints and other services, and
- customer service interface to administer the artists, artwork, and orders.
The fine arts application is an ASP.NET Web Application, written in C# 2.0 using Microsoft Visual Studio 2005. The solution uses SQL Server 2005 for storage of artist and artwork data. The solution integrates XML Flash Slideshow v3, an Adobe Dreamweaver Flash-based extension from dwusers.com, to display the artist's portfolio. In addition, the solution automatically creates thumbnails and larger preview images of the artwork using ImageMagick. ImageMagick is a free application from ImageMagick Studio LLC. ImageMagick is available for multiple Operating Systems and programming environments.
Using the Code
The Application
The application calls ImageMagick v6.4.5 from the command-line to create thumbnails and previews from a single uploaded image file. It duplicates the approximate functionality of the aforementioned fine art solution's thumbnail/preview creation routine. The application is written in Visual Studio 2008 using C# 3.0. This simple application contains a single Web Form and an associated class file. The application's workflow is as follows:
- User uploads a TIFF or JPEG image, less than 4 MB in size.
- Application verifies the image has been successfully uploaded, and is within the specs above.
- Application calls ImageMagick from the command-line to return information about the uploaded image.
- Application calls ImageMagick to create a small thumbnail image from the uploaded image.
- Application calls ImageMagick to create a medium-sized preview image.
- Application deletes the original uploaded file from the server.
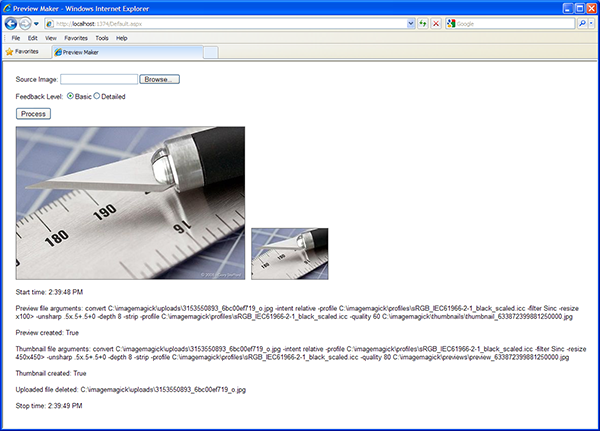
- Application returns a detailed status report of all the actions to the user.
Using ImageMagick to return information about the uploaded image is for demonstration purposes only (Step 3). The status reporting is also for demonstration purposes (Step 7). Commands passed to ImageMagick by the application's methods are shown to the user.
Preparing to Install the Application
In order to compile and run the source files provided, you must complete two simple tasks. First, download and install ImageMagick. As of the date of this article, v6.5.2-1 is the most current. Since the instructions to install ImageMagick are so well documented at http://www.imagemagick.org/script/binary-releases.php#windows, I won't be redundant, herein.
Secondly, install the folder-set I have provided as part of the source code. Inside the ImageMagick parent folder of the set, there are four folders. They will hold uploaded images, thumbnails, previews, and an ICC color profile. The profile ensures optimal color accuracy during image conversion and display of images in the web-browser. The source code assumes you will install the folder-set at the root-level of your C: drive (c:\imagemagick). You can easily change this property in the source code, if necessary.
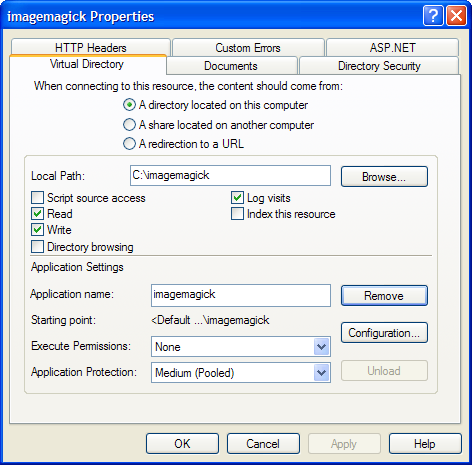
After downloading the folders, create a virtual directory within Internet Information Server (IIS), with the local path pointed to the ‘imagemagick' folder (see screen capture below). This step is necessary so the application can display the preview and thumbnail in the web-browser after they are created.
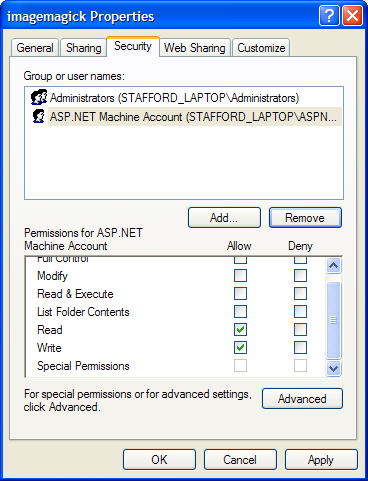
Lastly, you must give the ASP.NET user account read and write access to the folder-set (see screen capture below). The Web Application, and subsequently ImageMagick, will need these privileges to create the new images in the appropriate folders, read the images back into the web-browser, and delete the original uploaded image.
Installing the Application
Now, you can download and install the source files and compile the web application. To do so:
- Create a new C# ASP.NET Web Application in VS 2008 called ‘IMPreviewDemo'.
- Replace the Default.aspx Web Form with the Default.aspx form provided.
- Install the ImageMaker.cs class file in the root directory of the IMPreviewDemo application.
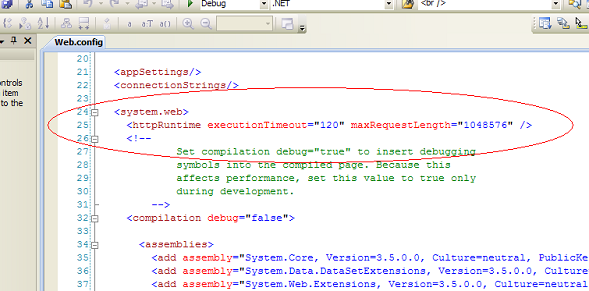
- Optionally, open your existing Web.config file and add a
<httpRuntime/>tag to the<system.web>section (see screen capture below). This will allow you to adjust the maximum allowable uploaded image size and set a time limit for uploads to complete.
The Code
In the Default.aspx Web Form contains the VerifyUpload() method. VerifyUpload() checks that the file has successfully been uploaded, checks that the file is either a JPEG or a TIFF file, and checks that it is less than 4 MB (value in bytes). VerifyUpload() returns a boolean value indicating whether or not all three tests were passed. Only then is an instance of the ImageMaker class created, and a call placed to the ProcessImage(string uploadedFile) method.


Comments
ASP.NET Training
ASP NET Training
ASP.NET Online Training
C# Training
Dot Net Training in Chennai
Dot Net Training institutes in Chennai
ASP.NET Training